Showing posts with label Wheat Free. Show all posts

July 16, 2014

Chia Strawberry Jam

We've got plenty of PB&J coming out of our kitchen and there is nothing better than this classic American sandwich made with homemade jam. Except when it's also made with homemade peanut butter and bread ... but let's not get carried away. The problem is that most jam, homemade or not, has a ton of sugar in it. Not this recipe from my Oh She Glows cookbook! Jaden and I made this today with stunning results. I've got a jar of jam with pretty much no sugar and two very happy lunchers. And the house smells amazing.

Makes one jar of jam.
Lasts three weeks refrigerated in an air-tight container.
  • 3 cups fresh or frozen strawberries
  • 3 tablespoons pure maple syrup
  • 2 tablespoons chia seeds 
  1. Rinse berries and remove tops. Quarter and place in a medium sauce pan with the syrup. 
  2. Cook on medium low for about 5 minutes, stirring frequently.  
  3. Gently mash the strawberries with a potato masher (or a fork) once they transform into a sauce. A little chunkiness is a good thing! 
  4. Add chia seeds and continue to cook on low for 15 minutes. Stir periodically. The jam will thicken. 
  5. Transfer to a glass jar and allow to cool completely before refrigerating. 

July 10, 2014

Grilled Artichokes


Grilled artichokes are impressive, delicious, nutritious and easy. The perfect veggie to build a summer dinner party around. Serve with Almond Mayo, white wine, crusty bread, European cheeses and garden salad.

Serves  4 - 6, depending on accompanying side dishes.
Refrigerate leftovers in a sealed container for up to 3 days.
  • Sea salt
  • 1 lemon
  • Extra virgin olive oil
  • 3 fresh artichokes 
  1. Cut your artichokes in half lengthwise. You'll need a big, sharp knife. 
  2. Place artichokes into a large pot and cover with cold water, add a generous pinch of salt. Squeeze the lemon into the pot and toss in the rinds (you'll discard them later). Drizzle in some olive oil - about 1 tablespoon. 
  3. Bring pot to a boil and cook at a gentle boil for 15 minutes. Meanwhile, heat up your grill. 
  4. Transfer your artichokes onto a large plate or platter with tongs. Gently shake excess water back into pot. 
  5. Grill on medium-high, flat side down, for 12 - 15 minutes. Artichokes should be golden and a little crispy but not burnt. 

Almond Mayo


It's been a really busy two years ... and sadly, food blogging has had to take a back seat. But, as anyone who spends time in the front seat knows, those in the backseat make themselves known. When I make something yummy and inventive, I usually note to myself that I should put it on the blog. This afternoon I said it aloud (still to myself) and Joey cheerfully declared (not to himself) that if I can't blog in July, then I will never blog at all. He's right. So tonight I decided to add something to the blog.

Three reasons not to wait two years between posts:
  1. Picture issues: I used to be so diligent about taking pictures, uploading them and posting them. No more, my friends. I didn't even bring my camera on vacation this year. Uploading took an hour and I found that I had taken photos of eight other dishes in anticipation of someday blogging about them. One of them, taken last July, looks delicious, but I don't remember how I made it. 
  2. Logging back on to the blog may take a while due to not remembering URLs, passwords, etc.  - or your blog account may have been discontinued. This blog was created when I was still using Hotmail and now that Blogger is owned by Google, well, they don't really like that. But here I am, logged on with the Hotmail because I can't seem to get it switched over. 
  3. You may find yourself rambling about stuff no one cares about. Wait, isn't rambling about whatever you want the whole reason why people start blogs?! 
So tonight's blog post is inspired by artichokes. I decided to make grilled artichokes and I wanted to make homemade mayonnaise to go with them. I had made a soy mayo in the past, which is fine but I was actually thinking of making a more traditional recipe. I was flipping through my Whole Life Nutrition cookbook and found a recipe based on almonds. Dan the Egg Man was out of eggs today and I actually had almonds in my pantry. I might never make another mayo recipe again - I loved this one! And so did the boys and the people who came over for dinner. It probably isn't fair to call it mayonnaise; it doesn't taste like mayo at all to me. But I would use it in all the same instances (buggers, egg salad, artichokes, tomato and kale sandwiches) and be much, much happier. I called it artichoke dip at diner so as not to confuse anyone - I've found it works better to totally re-name something than call it but a known name if it's an alternative version.

Almond mayo is raw, packed with nutrients, soy-free, egg-free, and super easy.  SOLD! To the lady who doesn't have time to blog! Also, Joe Mac, our neighborhood farmer and foodist approves.

Makes 2 cups.
Store in a sealed glass jar and refrigerate up to three weeks.
  • 1 1/2 cup almonds*
  • 1 cup warm water
  • 1/3 cup raw apple cider vinegar
  • 1 1/2 teaspoons sea salt
  • 1 tablespoon dijon mustard 
  • 2/3 cup extra virgin olive oil 
* I used whole almonds because I was using a Vitamix. If you have a regular blender, then chop up your almonds to help it along. 
  1. Combine almonds, water, vinegar, salt and mustard in blender. Blend until smooth. 
  2. With blender on low, slowly add your oil. Blend until well combined; mixture should thicken quickly. 

August 22, 2012

Blueberry Oat Bars

Bars are a big deal at our house. We love them and we go through a ton of them every week. Honestly, I don't try very hard to make my own, even though I KNOW how much better homemade tastes. In any case, I am inspired now with blueberry season here and my parents' enormous blueberry bushes to make bars. Blueberry bars. These were a big hit and are low in sugar (I skipped the strudel top) and high in energy (oats and almonds!). Jaden thought it was cake, but then, he's always looking for cake and ice cream lately. These are perfect for breakfast, for afternoon snacking, or dessert.

Makes about 12 bars
Good for about 3 days if sealed in a container.

  • 2 cups oat flour (you can make this by processing oats in the food processor). 
  • 1 cup rolled oats
  • 1 teaspoon baking soda
  • 1/4 teaspoon salt
  • 1 cup almonds, ground
  • 1 teaspoon cinnamon
  • 6 tablespoons honey
  • 1 large banana (ripe)
  • 1/4 cup coconut oil
  • 1/4 cup almond mil
  • 2 cups fresh blueberries 
  • 1 teaspoon vanilla 
  1. Preheat oven to 350F. 
  2. Mix four, oats, baking soda, almonds, and cinnamon in large bowl. 
  3. Mix banana, oil, honey, milk, and vanilla in a food processor until smooth. Add to four mixture and mix well. Gently stir in blueberries. 
  4. Transfer mixture to greased baking dish (8x8 works well). Bake 30 minutes, until top is golden. Allow to cool before cutting into bars. 

August 14, 2012

Carrot Top & Almond Pesto

I had in the back of my mind that carrot tops (the greens) are edible, but I'd never used them. When my mom brought some beautiful carrots home from the farmer's market and chopped the greens off last week, I grabbed them and put them in a jar of water, exclaiming that I planned to use them. The next day I got around to checking recipes out online. I didn't look long - I really just wanted to see if you could actually eat carrot tops.

You can. And they are super good for you (high in potassium). I didn't see any recipes that I wanted to use in the three seconds I spent looking and marched into the kitchen determined to make a make-shift dip. What a treat it turned out to be! I thought the greens would be a tad bitter and was planning to even the dip out with some honey - but they were perfect on their own. No sweetening needed. This recipe makes a really delicious and nutritious dip to use on sandwiches, as a pesto with pasta, a sauce with rice, or as a dip for crackers. We devoured this marvelous vegan, raw wonder with enthusiasm. 

Makes 1.5 cups
Does not save well - might freeze better, but we didn't test it. Best if eaten the same day. 
  • 1 bunch carrot tops
  • 1 cup ground almonds
  • 1/4 tsp freshly ground sea salt
  • 1/3 cup olive oil 
  • 2 tablespoons favorite balsamic vinegar (I used 18-year mango)
  1. Roughly chop your greens. 
  2. Process everything together in a food processor until well ground. Taste, adjust seasoning as desired. Would be good with some red pepper flakes if you like a little heat. 
  3. Serve immediately or within a few hours. 

June 8, 2012

Risotto Cakes

Here is a magnificent trick to using up leftover risotto as shared with me by the ever-talented and awesome Enrico (who, by the way, is authentically Italian and knows what he's talking about when it comes to risotto). Risotto is a deliciously creamy and yummy way to eat rice. It takes a little more time and attention to prepare, but with a glass of wine the time flies by. Additionally, risotto recipes tend to make a huge portion of food -  great to make for a crowd and you'll still likely have leftovers. Amazingly, I haven't posted my favorite risotto recipe ... I promise to do that someday. In the meantime, find a recipe you like and then try this out the next day. Serve with white wine and a big green salad for optimal happiness.

These leftovers make great leftovers!
Best served warm.

  • Olive oil 
  • Leftover risotto
  • 1/2 Corn meal in a saucer
  • Italian herbs 
  • Mayo (or some other kind of saucy/dippy thing)
  1. In a heavy fry pan, heat enough oil to cover the bottom of the pan (about 1/8 inch) to medium. 
  2. Form risotto into patties, about 1/3 inch thick 
  3. Pat the patties into the cornmeal like you're breading it. No need to worry about how much to get on the patty - risotto is sticky and you're simply aiming to get an even coat. 
  4. Set patties into fry pan and fry until golden and crispy - about 4 minutes per side. 
  5. Transfer from pan to plate, sprinkle with Italian herbs, add a dollop of mayo, and serve! 

April 10, 2012

Fresh Zucchini and Olive Stuffed Tomatoes

Joseph and I hosted Easter brunch this year. Well, actually, what really happened is that I decided that I wanted to have a vegan holiday - it just seems so reasonable to pair this diet with joy and renewal of Easter time. So, I announced that I would be hosting a brunch and that friends and family were welcome to join. I figured a few people would show up...not over 30 people! Thankfully, we had the best weather ever so no one had to be crowded in our bite-size house and we had tons of wonderful, delicious, healthful food. I was in heaven. We are so doing it again next year. 

The idea for these little tomatoes came from a dinner party that I had a couple of years ago. No cooking involved - just chopping. These are totally raw and super fresh and tasty - perfect for any spring or summer gathering. 

Makes 24 appetizers. 
Does not keep well overnight. 
  • 12 small tomatoes
  • 2 medium zucchinis
  • 1 jar green or Katamala olives 
  • Italian seasoning 
  • Rice wine vinegar 
  • Juice of one lemon
  • 3 tablespoons best quality extra virgin olive oil 
  • Freshly ground sea salt and black pepper 
  1. Gut your tomatoes: Slice off the top and carefully 'cut' out the insides with a spoon (use a grapefruit spoon if you have one). You can either use the whole tomato for larger servings or, as pictured above for smaller servings, cut them in half lengthwise to make little cups. Reserve tomato guts for future use in another dish or to make a sauce. Set gutted tomatoes aside. 
  2. Chop zucchini and olives into small pieces. 
  3. In a large bowl combine zucchini, olives, Italian seasoning, a splash of vinegar, lemon juice, and olive oil. Toss well. Season generously with salt and pepper. Taste. Season again as needed. 
  4. Stuff each tomato with zucchini mixture and arrange on serving plates or platter. 
  5. Serve immediately or refrigerate for up to 3 hours ahead of time. 

April 7, 2012

Roasted Potato and Radish Salad

I have a tendency to buy radishes because they are so beautiful and then not use them. These poor little radishes pictured here sat in my fridge for more than a week before I finally found a use for them in my lovely Potato cookbook. Amazingly, they were still in crisp and crunchy condition. 

This is a wonderful spring recipe and an excellent use of radishes. Although the radishes take center stage upon first glance, it's the potatoes that actually steal the show for me; I confess to being a roasted potato lover. And the dressing is also very good. In fact, it's wonderful because it overcomes the need to use catsup with the potatoes. (Everyone knows roasted potatoes normally go with catsup, right?) The combination of crispy potatoes, fresh radishes, and crunchy walnuts makes for some great texture and wonderful flavors. Aside from the time it takes to roast potatoes, this dish comes together quickly and is a lovely twist on brunch, lunch, or supper side dish. 

Serves 4. 
  • 1 pound red potatoes, cut into bite-sized pieces
  • Olive oil 
  • Powdered garlic 
  • Italian seasoning 
  • Sea salt 
  • Freshly ground pepper 
  • 8 radishes, thinly sliced 
  • 2 tablespoons rice wine vinegar
  • 1 tablespoon Dijon mustard 
  • 1 teaspoon agave or honey 
  • 1/3 cup walnuts, chopped
  1. Preheat oven to 400F. 
  2. In a large bowl, toss the potatoes with 2 tablespoons olive oil and generous sprinklings of garlic powder, sea salt, black pepper, and Italian seasoning until well coated. Arrange potatoes on a foil-lined baking sheet and bake until golden and slightly crispy - about 40 minutes. 
  3. Meanwhile, make the dressing. Whisk together 3 tablespoons of olive oil, vinegar, mustard, and agave/honey. Season with a pinch of salt and pepper. Taste and adjust as needed. 
  4. When potatoes are done, place them on a platter or plates. Top with radishes, and drizzle with dressing. Finnish with walnuts. 
  5. Serve immediately. 

April 4, 2012

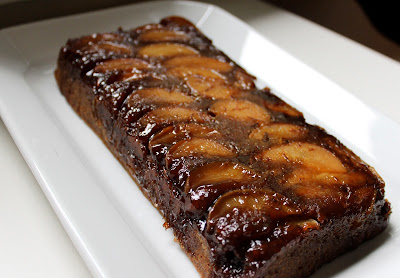
Saffron Scented Pear Upside Down Cake

I've had this recipe in my 'to be tested someday' book for about three years. Since I had a whole bunch of pears lying around, I figured I'd better give it a try. I modified the original recipe (not sure where it came from by now; probably Martha Stewart) to be diary and wheat-free. It turned out well - I was totally surprised by it, since I so rarely make any upside down cake. It really is fun to pop the cake out and see how the top turns out. When it came out, it really reminded me of a tarta one might find in Spain. They don't have many tall cakes - and they are often more earthy and imperfect, as this one is. They also rarely frost their cakes, much to my liking. 

This cake is dark, rich, and dense. It would make the perfect dessert for a more formal dinner or afternoon tea/coffee. You could even add it to a brunch. If you don't have saffron, make it without and it will still be very good. However, the saffron adds an exotic kick that elevates it from 'nice' to 'wow', if you know what I mean. 
  • Pinch of saffron 
  • 1 cup sugar (I used organic raw brown sugar - you can use that or regular white)
  • 1/4 cup butter (I used Earth Balance), softened 
  • 4 small pears, thinly sliced 
  • 1 1/3 flour (I used Bob's Red Mill all- purpose flour)
  • 1 1/2 teaspoon baking powder
  • 1/2 teaspoon ground ginger
  • 1/2 teaspoon sea salt
  • 3/4 cups organic soy milk 
  • 1/4 cup vegetable oil (plus more for greasing the pan)
  • 2 tablespoons ground flax seed + 6 tablespoons water (combine and set aside for at least 2 minutes)
  • 1 teaspoon vanilla extract 
  1. Preheat oven to 350F and grease a loaf pan with vegetable oil. 
  2. In a small bowl, mix saffron and 1/4 cup sugar together. Add the butter and combine well (I used my KitchenAid for this part). Spread mixture into the bottom of your loaf pan. 
  3. Arrange pears over the sugar mixture in your pan. 
  4. In a large bowl (or your cleaned out mixer bowl), whisk together flour, remaining 3/4 cups sugar, baking powder, ginger, and salt. 
  5. In a separate bowl, combine milk, flax seed mixture, vanilla. Slowly add to flour mixture and mix gently until combined. Spread over pears in your loaf pan. 
  6. Bake until set - 40 - 45 minutes. Allow to cool 5 minutes. Run a knife along the edges to loosen it. Place serving platter onto loaf pan and flip over so that cake comes out of loaf plan directly onto serving platter. If it doesn't pop out immediately, give it a minute or two. Still not out? it back back. 
  7. Serve. 

April 2, 2012

TeeTee's Chunky Guacamole

Avocado may be the most popular item in our house. We all love it. REALLY, really love it. And truly, is there a more perfect food? This guacamole is by far the very best I have ever had. I don't make guacamole often. And until now, I didn't have a go-to recipe. This one fell from the sky from my sister, Teresa (known in our house as TeeTee). We took this dish to a guacamole contest - and we won! It was so exciting. Not only is it so unbelievably delicious, but it's also gorgeous. Make this and share with others - you can be assured that it's wonderful. Also, it's so chunky that it could be served as a side dish/salad with rice and beans or some other mexi type dish. Mmmm....

Makes one large dish full.
Serve within a few hours, does not hold over well overnight.

  • 4 avocados, pitted and diced (reserve pits)
  • 2 cups cherry tomatoes, halved
  • 1 cup white corn (if frozen, allow to thaw out before using - do not microwave!) 
  • 1 bunch cilantro, roughly chopped 
  • 1/4 cup very finely chopped sweet onion
  • Juice of 2 limes 
  • 1/2 teaspoon cumin 
  • Sea salt 
  • chili powder 
  1. In a large bowl, gently combine all ingredients minus salt and chili. 
  2. Season generously with salt. Taste. Add more salt. Taste again. Repeat as needed. 
  3. Season with chili powder. Taste. Season again with salt and chili as desired. 
  4. Transfer to serving dish and top with pits to preserve color.   

March 21, 2012

Broccoli with Lemon and Saffron Scented Rice

My sweet sister-in-law Susan gave me The Northwest Vegetarian Cookbook for Christmas. It's got some great dishes to offer, including this one. The lemon is perfect for spring time - just enough pep to brighten up the table without going too crazy after a long winter. Brown rice takes longer than white rice to cook - about 35 minutes. But aside from that, this meal is a snap to put together. This method of cooking rice with a whole bunch of spices is wonderful. It adds so much flavor and makes the rice kind of creamy. It also eliminates the need for a sauce - one less thing to do, one less dish to clean. 

Serves 6.

  • 1 3/4 cups water
  • 1 cup brown rice
  • 2 pinches saffron threads
  • Zest and juice of 2 small lemons
  • 1/2 tablespoon honey or agave
  • 1/2 teaspoon salt 
  • Pinch of chili powder 
  • 1 Tablespoon extra virgin olive oil plus more for sauteing the broccoli 
  • 1 tablespoon vegetable Better than Bullion 
  • 1/2 teaspoon garlic powder 
  • Freshly ground sea salt 
  • Red pepper flakes 
  • 4 cups fresh broccoli, 
  1. Put all ingredients minus the broccoli in a medium sized pot. Stir to combine. Bring to a boil and reduce to a simmer until fully cooked - about 35 minutes (depends on your altitude). 
  2. In the meantime, cut up broccoli into bite-sized pieces. Drizzle olive oil into a hot fry pan and add broccoli. I usually add more olive oil - we love the stuff. Saute on high for a few minutes until bright green - it's ok if it gets a little browned in some places - makes it a little crunchy. Don't overcook your broccoli - you want it to be naturally crunchy not limp. It tastes better and is more nutritious this way. Season with garlic, salt and pepper as desired. 
  3. Fluff rice with a fork and place on serving platter to divide onto plates. Top with broccoli and serve. 
  4. Makes great leftovers. 

March 13, 2012

Quinoa and Ginger Stuffed Peppers

It's not that I haven't been cooking lately - it's that I haven't been cooking anything new. And if I do, then I just don't have that extra hour to take a picture and post it for you guys. Don't think that I'm not wishing I were posting more often ... I longingly glance over at my cookbook shelf daily. I regularly think to myself that I'll make time to post. what's going on? I have 2 baby boys! Sigh. And they are amazing and beautiful, and full of energy. Ethan just reached 6 months and is already exceedingly attentive to his older brother. They will be quite a pair come summer, I'm sure. 

Three days ago I made these delicious stuffed peppers and it really felt like a big accomplishment. So here I am, in the middle of the night, telling you all about it. If you can picture it, Jaden was in his safety tower and neon green apron with his whisk directing the whole operation while Ethan gripped the 1 cup measuring cup while sitting on the counter in one of his many chairs. I may have to rename this blog cooking with kids. In any case, this dish is, of course, easy and nutritious. Perfect for a spring dinner with friends. Serve with a simple green salad and your set! 

Serves 2 plus extra for lunch the next day.

  • 2 bell peppers, seeds and tops removed
  • 1 cup quinoa
  • 1 tsp 'better than bouillon
  • 1tsp rice wine vinegar 
  • 1/4 cup Annie's Gingerly Dressing
  • Olive oil 
  • 1/3 cup dried cherries
  • 1/2 cup cherry tomatoes, halved
  • 1/4 cup almonds, chopped
  • Garlic powder 
  • Sea salt and freshly ground pepper 
  1. Cook the quinoa according to package directions, but add the bouillon to the water. 
  2. Preheat oven to 350F.
  3. In a large skillet, heat up about 2 tablespoons of oil on medium high heat. Add the quinoa and saute - what we're doing here is browning it up a bit to give it a ver slight crunch. Very slight. 
  4. Generously sprinkle with more olive oil and garlic powder. Add vinegar, dressing, cherries, tomatoes and almonds. Mix well and keep browning. 
  5. Taste and season as desired with salt and pepper. Remember that there is salt in the bouillon. 
  6. Stuff quinoa in to pepper and pace in a baking dish. Bake for 20 minutes. I like my peppers to be hot but still crunchy - if you like them soft, cook them longer. 
  7. Remove from oven, carefully cut in half (they're hot!) and serve. 


November 28, 2011

Roasted Pumpkin Stuffed with Herby Potatoes

You know those cute little pumpkins they sell at the grocery store? You can eat them! And they are delicious! (As long as they aren't shellacked - look for the ones that look natural rather than super shiny). This little dish is fun, festive, and really good for you. Sincerely, it's JUST a roasted pumpkin with mashed potatoes - super easy! The best part of these cute little treats is that kids love them. Jaden's eyes widened and with a squeal of delight, he ate it right up. Total joy for the mommy. 

Serves 6. 
  • 6 mini pumpkins (not the super shiny ones)
  • 3 large potatoes
  • Olive oil 
  • 1/3 cup milk (I used soy milk)
  • Sea Salt and freshly ground pepper
  • 1 teaspoon Italian dried herb seasoning
  1. Pre-heat oven to 350F. Slice tops off of pumpkins and gut out the insides. Reserve seeds. Brush insides with olive oil, sprinkle lightly with salt and bake for 45 minutes - lids off. Remove from oven and set aside. 
  2. Meanwhile, wash and cube your potatoes. I never peel them, but you can if you want to. Boil them in salted water until tender on medium heat. About 20 minutes. Drain and place into large bowl. Mash together with a generous drizzling of olive oil, milk, generous pinch of salt and pepper, and Italian herbs. Add more oil to taste and consistency. If they are really dry, add more milk. 
  3. Stuff the pumpkins with mashed potatoes, top with the pumpkin lid and re-heat in the oven until ready to serve. 


November 10, 2011

Swiss Chard and Pepita Salad

It's time for winter salads, and this is my new favorite salad ever. It turns out that my summer crop of chard is now my fall crop of chard... and it may even become my winter crop. This is exciting. I love the idea of having garden-fresh greens all year. And these chard are so beautiful - and so low maintenance. You really should plant some chard.  In any case, this simple salad is packed to the brim with nutrients and is perhaps the best salad I've ever had. It's hearty, filling, and sturdy - you can make it an hour before you need it and it's not wilted. Not to mention, it's beautiful. Really - this would be a good one to take to a potluck event. 

  • 1 bunch chard, chopped
  • 1 small red cabbage, chopped
  • 1 ripe plum, peeled and chopped
  • 1/3 cup best extra virgin olive oil 
  • 1 tablespoon white vinegar
  • pinch of salt
  • freshly ground black pepper
  • 1 avocado, diced 
  • 1/2 cup roasted pumpkin seeds*
  1. Rinse and prepare your chard and cabbage. Set aside.
  2. Make your dressing: in a food processor, combine plum, olive oil, vinegar, salt, and pepper
  3. Toss chard and cabbage with dressing in a large bowl. Arrange greens on a serving platter. Top with avocado and pumpkin seeds. 
  4. Serve immediately or cover and chill for up to an hour. 
* To roast pumpkin seeds, rinse them well and pat them 'dry'. Toss them with a splash of butter, salt, and any other seasoning you want - cumin is a great choice. Arrange them on a baking sheet and bake for 45 minutes or until slightly crunchy on 300F. Check frequently - burnt seeds taste terrible. 

September 15, 2011

Ruby Red Summer Swiss Chard Salad


Ruby Red Swiss Chard fresh from the garden is amazing and delicious. Since this is the first year I've grown it, I admit that I am a bit overwhelmed by how much of it I have. I've been giving it away like crazy to neighbors and family - but by now it's high time I take better advantage of this dark leafy green rich in vitamins C, K, A and Iron. This salad is a the result of me testing out new ways to eat, and enjoy, chard.

I suppose the basis of this recipe is inspired by living in Spain, where we learned that everything tastes great with olive oil and balsamic vinegar, and this salad is no exception. I also wanted to work out a raw dish to best utilize the nutrients of our garden greens.

Serves four for salad, two for dinner.
Best fresh, but keeps refrigerated for 2 days.
  • 1 bunch Swiss Chard, washed and chopped
  • 2 ears fresh corn, husked and kernels removed - no need to cook them. Or one cup frozen corn - allow to defrost on the counter or in the salad - don't microwave it!
  • Highest quality extra virgin olive oil
  • Your favorite balsamic vinegar
  • Parmesan cheese
  • Dried cranberries
  • Freshly ground salt and pepper
  1. In a large bowl, generously drizzle olive oil and vinegar over the chard. Toss well.
  2. Arrange on a serving platter or dinner plates.
  3. Sprinkle with corn, cranberries, and cheese.
  4. chill and/or serve immediately.

August 22, 2011

East Indian Zucchini Dip


This recipe was born from me being unprepared to bring an appetizer to a party and looking through my pantry to see what could be quickly thrown together. It was a lucky and delicious break. Kind of sweet, kind of tangy. Kind of like hummus, but totally different. This dip is nutritious and a great use of zucchinis for those of you with gardens full of them right about now. Jaden and Joey loved it, as did people at the party. We'll certainly be making this one again!

Serve with crackers or veggie sticks.
Keeps 5 days refrigerated in an air-tight container.

  • 2 tablespoons olive oil
  • 1 tablespoon maple syrup (or agave)
  • 1 teaspoon rice wine vinegar
  • Generous pinch of sea salt
  • 1 teaspoon garam masala spice
  • generous splash of line juice
  • generous pinch of dried mint
  • Shake or two of garlic powder
  • 1 tablespoon tahini
  • 1 small zucchini, chopped
  • 1 can organic chick peas/garbanzo beans, rinsed
  1. Combine all ingredients together in a food processor until smooth. Add small amounts of water or olive oil to improve smoothness as needed.
  2. Taste and add more salt or pepper as desired.
  3. Serve immediately or reserve for later.

June 26, 2011

Dark Chocolate Frosting


Since moving back from Spain where I pretty much made everything from scratch, I've been cheating more frequently and buying pre-made items. As always, cheating doesn't pay off in the long run and I've wished nearly every time that I would have made the item myself. My most recent purchase and disappointment was chocolate frosting. Firstly, there was no corn syrup-free option. Secondly, as a direct result of the corn syrup, the frosting was way too sweet and had a terrible fake chocolate flavor. In fact, I believe that it was chocolate flavored. Disgusting.

The following recipe was noted in my cooking notebook from a while back sans credits. I think it came from a combination of Internet sources and testing. In any case, I LOVE this frosting and am so glad that I made it again to remind myself why I will never buy frosting again. In truth, this frosting takes less time to make from items already in your pantry than it does to got to the store and buy some. It authentically tastes like chocolate and if you close your eyes the gentle, creamy flavor can take you back to Brugge or Paris. I usually make a double batch to frost a large cake and have a little extra for tasting and sharing with Joey.

Makes 2 cups.
Keeps 5 days sealed well in refrigerator.
  • 2 2/3 cups powdered sugar
  • 3/4 cup cocoa
  • 6 table spoons fresh butter, softened (from experience: using old butter makes the from taste like old butter - that is a bad thing)
  • 5 - 6 tablespoons milk (any kind you typically use)
  • 1 teaspoon vanilla
  1. In a medium bowl, whisk together cocoa and sugar.
  2. In a mixing bowl with a hand mixer or a stand mixer, cream the butter. Add half the cocoa mixture.
  3. Alternately add milk and cocoa to butter mixture while mixer is running. Beat to spreading consistance. Add vanilla.
  4. Frost cake or cupcakes immediately.

December 15, 2010

Spanish Christmas Fudge with Sea Salt


This is good fudge. It's tried and true. It's rich and creamy. It's sophisticated and festive. It's quick and easy. What makes it Spanish is the use of dark chocolate and cinnamon. And the salt I used is actually from El Corte Engles in Sol, Madrid. They sell nice salt. Truthfully, I never ate this while living in Spain...but I imagine that if they made fudge, they'd make it like this. Generally, I'm not a big fan of fudge. I like the idea of it though and I found this recipe in The Joy of Vegan Baking. I added cinnamon and my sister, the Salty Fox, suggested sprinkling flaky salt on top. It's awesome. We passed it out to our whole neighborhood today. Oh, the joy of Christmas time.

Makes 3 dozen fudge squares. Keep sealed and refrigerated up to 4 days.
  • 12 ounces dark chocolate, broken into chunks
  • 6 tablespoons non-hydrogenated non-dairy butter (I use Earth Balance buttery spread)
  • 3 1/2 cups powdered sugar
  • 1/2 cup unsweetened cocoa powder
  • 1 teaspoon vanilla
  • 1 teaspoon ground cinnamon
  • 1/4 cup coconut milk
  • flaky sea salt for sprinkling
  1. Lightly grease a baking sheet with butter. You'll only need half of it unless you double the recipe.
  2. In a double-boiler*, combine all ingredients together over medium-high heat. Keep a close eye on the mixture, stirring regularly until smooth. Don't leave it - it will burn!
  3. Quickly pour the mixture into your prepared baking sheet and spread evenly with a spatula. You want the fudge to be about half an inch thick.
  4. Let it sit for 2 minutes. Sprinkle with salt (use your fingers to ensure consistency and control). Cover with plastic wrap and refrigerate for at least 1 hour before serving or packaging for gifts.

December 3, 2010

African Yam and Almond Soup


It was bound to happen. I've been calmly anticipating it for some time, careful not to rush too quickly into a life change that may cause bitterness. I became a vegetarian about 8 years ago and haven't looked back since. Last week, I finally said adios to diary. I'm not going to insist on vegan out in the world (yet), but in my own home we're going vegan. I gave away the butter, tossed out the sour cream, avoided the cheese isle in the grocery store. I feel good. In fact, I feel great. The final deciding factor was reading the China Study. You should read it. Seriously. But be warned, it's like taking the blue pill instead of the red one. No more happy wonderland of animal protein ignorance. Ok, so I decided to invest in a couple of actual vegan cookbooks to make the transition easier. I also did a little research on vegan chefs (note some changes on my like list to the right.) It's working. I am inspired and I feel awesome.

This soup...oh, my. This soup. When you eat this soup you KNOW that you're loving yourself. It's got that much goodness in it. As usual, it's easy to make and delicious. It's based off of a recipe from The Vegan Table, which I recommend. I made several changes to it based on what I had int he house (most notably, I used almond butter instead of peanut butter).

Serves 6 + leftovers.
Better as leftovers! Keeps in the fridge for about 4 days.

  • 2 tablespoons olive oil
  • 1 medium onion, finely chopped
  • 3 cloves garlic, finely chopped
  • 2 red bell peppers, finely chopped
  • 1 tablespoon agave
  • 1 teaspoon ground ginger
  • 1 teaspoon ground cumin
  • 1 teaspoon ground cinnamon
  • 1/2 teaspoon cayenne pepper
  • 3 tablespoons almond butter
  • 3 yams, peeled, cubed and steamed 12 minutes
  • 1 can/jar garbanzo beans, rinsed
  • 1 can/jar black beans, rinsed
  • 1 can stewed tomatoes
  • 1 cup sweet corn
  • 4 cups vegetable stock
  1. In a large soup pot, heat the oil and saute the onions until softened. Add bell pepper and cook until softened - about 4 minutes.
  2. Stir in agave, ginger, cumin, cinnamon, and cayenne. Cook for 30 seconds. Add the yams, beans and tomatoes. Mix well.
  3. Add the almond butter to the veggie stock and whisk until well combined. Pour into sop pot. Reduce heat and simmer for 30 minutes.
  4. with a potato masher, mash the yams well. It's fine that other ingredients are also mashed, but don't worry if some items are still in tact. You just want to be sure the yams are no longer cubes. This will make the soup creamy.
  5. Taste and season as needed with salt and pepper.
Note on leftovers: if you save this soup, note that it will absorb most of the liquid so it becomes a lovely dip with corn chips or a spread for tortillas or dense bread. If you want to make it a soup again, add a bit of water and stir well over medium-low heat. Continue to add water until you have the constancy you're looking for.

October 31, 2010

Pumpkin, Bean, and Sweet Corn Mash

Happy Halloween! I wanted to be sure to use pumpkin today, and I just got a new cookbook, so I was feeling extra inspired. This is a Peruvian recipe packed with all kinds of healthful goodness: protein, fiber, antioxidants, vitamin A, vitamin C, potassium, and iron...just to name a few. Ok, so this is really good for you, easy to make, and fairly inexpenice. It get's better: it tastes wonderful, especially on a brisk fall day. The combination of spices and veggies provides a satisfying experience both for your belly and your mouth. I added almond milk and cinnamon to this recipe, otherwise it's primarily based on the one I read in One World Vegetarian.

Serves 4 with leftovers.
Keeps well sealed tightly in the fridge for 5 days. Probably freezes well, too.

  • olive oil
  • 1 onion, chopped
  • 2 garlic cloves, chopped
  • 4 tomatoes, chopped
  • 1 teaspoon paprika
  • 1/2 teaspoon cumin seeds
  • 1 teaspoon ground cinnamon
  • 2 cans white beans, rinsed
  • 1 cup sweet corn, fresh or frozen
  • 2 cups pumpkin; steamed, peeled, and cubed
  • 1/4 cup basil, chopped
  • 1/4 cup almond milk
  1. In a large fry pan, saute the onion in olive oil until softened and browned. Add the garlic, tomatoes, paprika, cinnamon, and cumin. Cook for an additional minute or two.
  2. Stir in the beans and sweet corn. Cook until warmed through. Add the pumpkin and the almond milk, mix everything together well. Cook for another five minutes, until everything is soft.
  3. Transfer to a large bowl and mash with potato masher. You may need to add more olive oil and/or almond milk to get the consistency you want. This step is optional, especially if you like chunky food.
  4. Mix in half the basil and season with salt and pepper to taste.
  5. Serve and garnish with remaining basil.